Tuesday, August 2, 2022

How To Harmonize Your Dual-Boot Setup for Windows and Ubuntu


Ref: https://www.howtogeek.com/howto/35807/how-to-harmonize-your-dual-boot-setup-for-windows-and-ubuntu/

Looking for some harmony between Windows 7 and Ubuntu in your dual-boot setup?  Here are a few ways you can make the tense OS situation a little more unified and copacetic.


0 seconds of 15 secondsVolume 0%
 

Background

When we covered How to Choose a Partition Scheme for Your Linux PC, we noticed that some people were wondering how to use a third partition between Linux and Windows to act as a storage partition.

Why It’s Difficult

As a few commenters pointed out, you can’t use an NTFS-formatted partition for /home in Linux.  That’s because NTFS doesn’t preserve all of the properties and permissions used by Linux, and Windows doesn’t even read Linux file systems.  You can readily see this if you view a folder that’s hidden in Windows from within Linux, or a file that Linux sees as hidden in Windows.  What works for one doesn’t work for the other.  Furthermore, there isn’t an incredibly clean way to move the Users folder in Windows without messing with things.  This is why many people with nicer machines end up using virtualization software; it’s easier than forcing the two to co-operate side-by-side.

win v tux banner

A Work-Around

There isn’t a way to run your /home directory from a FAT32 or NTFS partition, so your configuration files and scripts will have to remain there.  What you can do is redirect the other commonly used folders like Documents, Downloads, Music, etc. to another partition, one that can be read by Windows.  Then, you can add these folders to your Windows 7 Libraries and mark them as the default save location.

This isn’t a proper workaround.  Your program-associated configuration files and other user-related settings will not be in the same place for this setup.  If you have to reinstall either OS, you will have to perform a separate backup of your user settings.  That being said, however, most people are really just concerned about their documents, music, videos, and so forth.  This solves that issue by pointing both OSs to look in the same place for them.

Linux has come a long way with regards to reading and writing NTFS, and since it’s much better than FAT32 and tougher to configure this setup with, that’s what we’ll be covering in this guide.

Partition Scheme

For this to work, you’ll want your hard drive set up in a way similar to this

  • Your Windows partition
  • Your Linux partition
  • A large partition (or second hard drive!) to store your files
  • A small swap partition

For later convenience, when you format your storage partition to NTFS, add an easily recognizable label to it.  It’ll be easier to find a drive called “storage” or “media” than by counting partition numbers.

Notice that we don’t have a separate /home partition this time around.  Since the vast majority of your important/large files will be on a separate partition, this negates the need for that.  You’re welcome to use a separate /home partition to make backing up the Linux-side of things easier, just remember that you can’t exceed four primary partitions per disk.

Update: You can use more than four primary partitions if you use GPT instead of MBR.

Auto-Mount Your Storage Partition (Linux)

Since we’re using NTFS, it’s a good idea to specifically tell your system to mount your storage partition or disk in the same place every time you boot.  To do this, we’ll be editing the /etc/fstab system file, which is the file system table used by Linux, but first, we have some preparations to make.  Open up terminal, and if this makes you nervous, just take a deep breath and relax.  It’ll be okay.

Prep Work

We need to install ntfs-3g, the driver Linux will use to read and write to NTFS.  If you already have it installed, it’ll tell you, so don’t worry.

sudo apt-get install ntfs-3g

 If you see “ntfs-3g is already the newest version” then you already have it installed, otherwise you’ll see it work, so wait for it to finish its thing.  Next, let’s create the directory where your partition will mount.  If you want the drive to appear in the “Places” menu by default, you’ll use:

sudo mkdir /media/storage

If you don’t want it to appear in “Places” and you want to manually browse to it for whatever reason, you can use this instead:

sudo mkdir /mnt/storage

This will create a “storage” directory in /media.  You can change this to something else if you like, but be sure it does not have any spaces.  Spaces will create a problem when we configure it to automatically mount in the next few steps.

fstab

Now, it’s time to edit the fstab file.  First, we’ll create a backup, just in case anything happens.

sudo cp /etc/fstab /etc/fstab.backup

It’ll prompt you for your password, so go ahead and enter it.  If, for whatever reason, you need to restore the backup in the future, you would do this:

sudo cp /etc/fstab.backup /etc/fstab

Next, you need to find what the UUID of your storage partition is.  The UUID stands for “universally unique identifier” and acts as a proper serial number that will not change until the partition is reformatted.  Run the following command:

sudo blkid

Enter your password, and you’ll see some output resembling this:

/dev/sda1: UUID=”23A87DBF64597DF1″ TYPE=”ntfs”
/dev/sda2: UUID=”2479675e-2898-48c7-849f-132bb6d8f150″ TYPE=”ext4″
/dev/sda5: UUID=”66E53AEC54455DB2″ LABEL=”storage” TYPE=”ntfs”
/dev/sda6: UUID=”05bbf608-87fa-4473-9774-cf4b2602d8d6″ TYPE=”swap”

Find the line that has the correct label to your storage partition (makes things easy, doesn’t it?) and copy the UUID.

gedit admin:///etc/fstab

You’ll see gedit open, like so:

fstab before


You may see an uglier theme on gedit than usual, but don’t worry it.  Add the following lines to the bottom of fstab, substituting your own UUID instead of mine:

# storage mount
UUID=66E53AEC54455DB2 /media/storage/    ntfs-3g        auto,user,rw 0 0

The first line is a comment, indicated by the leading hash tag.  The next line tells fstab to look for the partition with the specified UUID, mount it to /media/storage/, and to use the ntfs-3g driver.  Furthermore, it makes sure that it automatically mounts at boot, makes it accessible by users (not just root), gives both read and write privileges, and skip file-system checks (you’ll probably want to use Windows to do that).  Lastly, double-check, and triple-check to make sure you didn’t touch anything else, and that the UUID is correct.

fstab after

When you’re ready, click save and then reboot.  Don’t skip the reboot, as it’s necessary for the next step as well as to make sure things work.

You should be able to boot into Ubuntu as if nothing happened, but you’ll notice that you’ve got “storage” (or whatever you named it) under the Places menu now!  If not, check to make sure you got fstab correct.  See above to restore fstab from your backup, if you need to.

Configure Your Subfolders (Linux)

Open up terminal and enter the following command:

gedit .config/user-dirs.dirs

This is the file where your “special” folders in your home directory are defined.

user-dirs before

You can edit this to your liking.  In place of where you see “$HOME/Downloads” you would put in an absolute folder location, like “/media/storage/Downloads”.  Go ahead and create those folders, or whatever folders you’d like to call them, and put the path down for each of these.  Here’s what the finished edit should look like:

user-dirs after

Click save, and we’re done the crux of the configuration.  You may need to reboot for these changes to take effect, but you can just boot into Windows to finish out the process in the next section.

Basically, now when you browse and put files in your “Downloads” folder, they’ll actually go to your storage drive’s “Downloads” folder.  Anything in your home folder itself will stay in /home/yourusername/, not on your storage drive.  A few of the folders, like “Desktop” and “Templates,” probably won’t benefit from this treatment, either.  Templates are rarely used, the desktop usually gets cluttered with shortcuts and the like, and the Windows desktop isn’t elegantly redirected, unfortunately.

Configure Your Subfolders (Windows)

Boot into Windows, and you’ll see that there’s another partition called “storage” under “My Computer.”  Windows 7 has the beautiful Libraries feature built-in, so take a look at our article “Understanding the Libraries Feature in Windows 7,” and you’ll see step-by-step directions on how to add your new storage folders to your libraries.

As you can see, my storage drive folders are a part of my libraries.  My storage drive letter is E: because my network share is at D:.  Also, take a look at our “Change the Default Save Folder for Windows 7 Libraries…” article so that when you stick things in your libraries, they automatically get saved to your new storage folders as well.

setting as default save location 

The last thing you’ll have to change is the default “Downloads” directory in your preferred web browser(s), which can point to your “Downloads” library.  All done!

It’s also worth mentioning that if you have some know-how, you could even do this with aremotely shared drive on your network, though it may prove to be too slow for actual use.  A better idea is to turn your storage partition into a shared drive that can be accessed by other computers in your network.

Saturday, October 2, 2021

How do you Know which Raspberry Pi Model you Have? (Flowchart)

 Ref: https://raspberrytips.com/which-raspberry-pi-model/


How do you Know which Raspberry Pi Model you Have? (Flowchart)

You bought a Raspberry Pi a few months or years ago and have no idea which model it is?
This is quite annoying because you often need this information to order the corresponding accessories or install a new operating system for example.
No worries, you are at the right place, I’ll help you find it easily.

How do you know which Raspberry Pi model you have?
The easiest way is to look for an invoice or email confirmation.
Two other methods are to read the model name on the board, or get the processor information from the operating system.

But, that’s not always possible.
The goal of this post is to help you to get this information and then deduct which Raspberry Pi model you really have.

I will start with a comparison of all Raspberry Pi models, then I will show you how to get each information, and will give you a flowchart to make everything obvious to you.

What are the different models of Raspberry Pi?

In this first part, I think it’s a good idea to start with a list of all Raspberry Pi models available on the market (current and old models).
I will not give you the full specifications for each one, but just the ones we may have to use later.

Raspberry Pi 1

Let’s start with the first model that was released by the Raspberry Pi Foundation.
They were released between 2012 and 2014 (if it helps you).
Here are the useful specifications to know :

ModelFormatPortsMemory
AStandard1x USB
HDMI
256 MB
A+Compact1x USB
HDMI
256 / 512 MB
BCompactEthernet
2x USB
HDMI
256 / 512 MB
B+StandardEthernet
4x USB
HDMI
256 / 512 MB
Standard = rectangular (85 x 56 mm), Compact = almost square (65 x 56 mm)

Raspberry Pi 1 A has 256 MB memory, the others have been released with 256 MB but upgraded to 512 MB in 2016.
So if you have no idea of the purchase date, the exact memory amount will not help so much here.
And for information, none of them can connect to a Wi-Fi network.

Raspberry Pi 2

There was only one model of Raspberry Pi 2 available on the market : the Raspberry Pi 2 B (in two versions as they upgraded the CPU in 2016).

ModelFormatPortsMemory
BStandardEthernet
4x USB 2.0
HDMI
1 GB

As you can see, there is almost no difference with a Raspberry Pi 1B+ if you have it in your hand, so it will be difficult to know which one you have just with this information.

Raspberry Pi Zero

The Raspberry Pi Zero is unique with its small format (half of the compact size), so it will be easy to identify this family.
But there are 3 versions available on the market:

ModelFormatPortsMemory
Zero / W / WHZero1x Micro USB
Mini-HDMI
512 MB
Zero is the smallest format with 65 mm x 30 mm

As all the three Raspberry Pi Zero models share the same specifications, here are the differences between them :

  • Raspberry Pi Zero: No Wireless
  • Raspberry Pi Zero W: Wireless
  • Raspberry Pi Zero WH: Wireless and pre-soldered GPIO header

Raspberry Pi 3

The Raspberry Pi 3 are more recent (2016-2018) and all of them have a built-in Wi-Fi card.

ModelFormatPortsMemory
A+Compact1x USB 2.0
HDMI
1 GB
BStandardEthernet
4x USB 2.0
HDMI
1 GB
B+StandardEthernet
4x USB 2.0
HDMI
1 GB

The Raspberry Pi 3 B+ has a better processor (1.4Ghz vs 1.2Ghz) and a Gigabit Ethernet port.

Raspberry Pi 4 / 400

And finally, the Raspberry Pi is only available since 2019, so you probably remember it if you have this one:

ModelFormatPortsMemory
BStandardEthernet
2X USB 2.0
2X USB 3.0
2x Micro-HDMI
1 / 2 / 4 / 8 GB

The main visible difference with all the other ones is the USB 3.0 and Micro HDMI ports.
I’ll show you in the next part on to recognize them.

More recently, the Raspberry Pi 400 has been released in 2020, but I doubt you need help to identify it. Currently, it’s the only one built into a keyboard:

Raspberry Pi 400

What do I need to know about my Raspberry Pi model?

You now have all the information, but it may not be enough to really help you find the model you have in your hands (or remotely connected).
That’s why I will give you more details here, on all the information you need to have about your Raspberry Pi before going further.

As you’ll see in the chart at the end, there is two main cases to identify a Raspberry Pi :

  • You have the board in your hands, but there is no system or even no SD card to help you find the information
  • Your Raspberry Pi is already up and running, maybe remotely, and you want to find the information on the system (via SSH for example)

Read this if Raspberry Pi OS is already installed

The easiest way to find which Raspberry Pi you have, is to have Raspberry Pi OS installed.

So, on a Debian system you have several files in the /proc folder.
For example, “cpuinfo” contains information about your processor, “meminfo” is for the RAM, etc.
My first idea was to look for the exact CPU model and RAM quantity.
But there is an easier way 🙂

When checking the “cpuinfo” file, I noticed that the Raspberry Pi was written clearly at the end of the file!
So, you just have to open the file and check the last line
Or you can display it directly with :
cat /proc/cpuinfo | grep Model

Here is what you’ll get :

pi@raspberrypi:~ $ cat /proc/cpuinfo | grep Model
Model : Raspberry Pi 4 Model B Rev 1.1

This should give you the answer directly, no need to analyze multiple specifications details to find your Raspberry Pi model 🙂
If it doesn’t work for you, you’ll probably need to check the next part.

Read this if there is no system on it

If you don’t have any SD card or operating system on your Raspberry Pi, and just want to check quickly if it’s worth using, you can guess it by following this.

Model name on the board

The easiest way with the Raspberry Pi in your hands is to check if there is something written on it.
Here is an example on my Raspberry Pi 3B+ :

I don’t have all the Raspberry Pi models, but for those I have I get the model name (and version) written on it.
So, I suppose it can help you find the model easily.

Display port(s) available(s)

If for any reason, reading the model name on the board is not possible, we will need to try other things to find the exact model.
I tell you right away, it’s not the easiest way to do this, and there is no guarantee as some models share some of these specifications.

So in this section and the following, I will show you a few things that may be useful to identify a Raspberry Pi model.
I recommend you to check everything, take note of this, and then try the flowchart at the end of the post.
(If you already have a good level, you can go directly to the flowchart)

The first thing to note is the display port available on your Raspberry Pi.
There is three possible types, as you have seen in the first part :

  • HDMI
  • Mini HDMI
  • Micro HDMI

Here are what these ports look like in the same order:

If you have a Mini HDMI, your model is a Raspberry Pi Zero. But you need to go further to know which version.
If there are two Micro HDMI ports, it’s a Raspberry Pi 4 B. Currently there is no doubt about this.

USB ports

The second information you may need is the number of USB ports, and their types.
The first Raspberry Pi had only one USB port, but they quickly add additional ports to the new models.
The last model currently, the Raspberry Pi 4 B has 4 USB ports (2x USB 2.0 and 2x USB 3.0).

USB 3.0 are faster than the USB 2.0.
So, if you have this model, you should plug your mouse and keyboard on the black ports, and your SSD disk on the blue ones.
Here is a picture to help you understand what I mean :

How many ports do you have on your Raspberry Pi?

  • Only one port ⇒ you have a model A or A+.
  • Two ports ⇒ It’s a Raspberry Pi 1 B. Blue ports? It’s a Raspberry Pi 4 B.
  • In other cases ⇒ you’ll need to get all the information and use the flowchart to help you determine the Raspberry Pi model you have.

Ethernet Port

Not every Raspberry Pi models have an Ethernet port on it.
The Raspberry Pi Foundation continue to release Raspberry Pi models without any Ethernet port to have a cheaper option available if you don’t need it.
Luckily, most of them now have a Wi-Fi card included, so you can still connect them to your network and Internet.

Anyway, for now just check if your Raspberry Pi has an Ethernet port, and remember this.

Raspberry Pi Zero: GPIO Pins

The last two things only apply to the Raspberry Pi Zero models.
So, if you know you have a Raspberry Pi Zero (Mini HDMI port), you will need them.

The first one is to check if you have GPIO pins on it or just holes.
If you have GPIO pins, and you have not soldered them previously, it’s a Raspberry Pi Zero WH.
If not, you need to check if there is a Wi-Fi card or not.

Raspberry Pi Zero: Wi-Fi card

Finally, the last thing to check, and only if you have a Raspberry Pi Zero, is the Wi-Fi card.

Indeed, the first Raspberry Pi Zero model had neither network card nor Wi-Fi card.
On the next versions, they added the Wi-Fi card on it (but still no Ethernet).

So, you need to check if there is a Wi-Fi card on your model.
Here is the card location circled in red:

Don’t see it? You have the first Raspberry Pi Zero model.
If you have it, this is a Raspberry Pi W (without GPIO pins) or WH (with them).

Flowchart : find you Raspberry Pi model

As I recognize all these specifications are not easy to read and analyze, I have spent a little time to build a chart that should probably be easier for you than all this information.
Just take your notes with you, and follow the chart below.

Start at the top and answer each question (by reading again the previous part if needed):

Flowchart to find your current model of Raspberry Pi

In most cases, you’ll find the model name written on the board, or thanks to Raspberry Pi OS (ex Raspbian).
I didn’t note it on the chart, but as I told you in the previous part, if you arrive at the “Raspberry Pi B or B+” point, you can also check the number of USB ports and formats to find the oldest ones :

  • Raspberry Pi model A or A+
    • 1x USB port :
      • Standard format : Raspberry Pi 1 A
  • Raspberry Pi model B or B+
    • 2x USB port : Raspberry Pi 1 B

Unfortunately, if this doesn’t help you, you have to install Raspberry Pi OS and check the processor information.

Want to be a part of the RaspberryTips community? Join us here and get access to behind-the-scenes content, my thoughts and more while supporting me to continue posting on this website.

Conclusion

That’s it, you now know how to find which Raspberry Pi model you have
If you have Raspberry Pi OS on it and can log in, it’s straightforward.
If not, you can try to find it by checking a few things on it (or installing Raspberry Pi OS^^).


Monday, February 1, 2021

How to fix application windows disappearing out of screen

 Ref: https://www.technipages.com/bring-off-screen-window-back-onto-screen


Recently had a download manager disappearing out of screen after cancelling the download multiple times. Not sure how did i managed to do that!


Luckily the helpful Mr Google pointed me to the a helpful post with multiple options to restore it :)

Windows: Bring Off-Screen Window Back Onto Screen

While using Microsoft Windows, I had a window that had somehow fallen completely off of my screen. Right-clicking the window in the Taskbar and selecting Maximize brought it back, but there was no way I could get the window restored to where I could move it around my screen with my mouse.

Luckily, there are a couple of ways to bring off-screen windows back to the desktop screen.

Fix 1 – Resolution Trick
Windows 10 & 8
  1. Start the problematic application.
  2. Right-click a blank area of the Desktop, then choose “Display settings“.
  3. Select “Advanced display settings” at the bottom of the window.
  4. Temporarily change the “Resolution” to another value, then choose “Apply“.
  5. See if you can see the window on your screen now.
  6. Change the resolution back to the previous value, then select “OK“.

Windows 7

  1. Start the problematic application.
  2. Right-click a blank area of the Desktop, then choose “Screen Resolution“.
  3. Temporarily change the “Resolution” to another value, then choose “Apply“.
  4. See if you can see the window on your screen now.
  5. Change the resolution back to the previous value, then select “OK“.

Fix 2 – Show Desktop Toggle

  1. Hold down the Windows Key, then press “D“. Repeat these steps to see if it makes the window you are looking for reappear.
  2. Alternately, you can right-click a blank area of the taskbar, then choose “Show the desktop“, then repeat.

Fix 3 – Move Option 1

  1. Select the program in the task bar.
  2. Hold the Windows Key while pressing Left Arrow or Right Arrow repeatedly to move the window back into view.

Fix 4 – Move Option 2

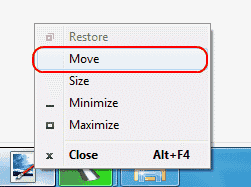
  1. In Windows 10, 8, 7, and Vista, hold down the “Shift” key while right-clicking the program in the taskbar, then select “Move“. In Windows XP, right-click the item in the task-bar and select “Move“. In some instances, you may have to select “Restore“, then go back and select “Move“.Windows option to Move window
  2. Use your mouse or the arrow keys on your keyboard to move the window back onto the screen.

Fix 5 – Cascade Windows

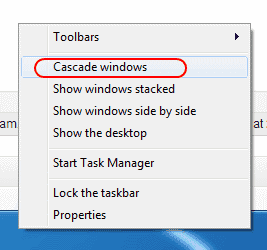
  • Right-click a blank area of the task-bar, then select “Cascade windows“.
    Win7 Cascade windows option

Fix 6 – Maximize

Sometimes a single app will get stuck in a state where it cannot redraw onto the Window. You can usually alleviate this by doing the following.

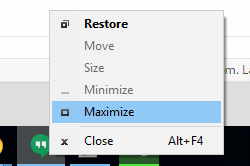
  • Hold “Shift” and right-click on the program icon in the taskbar, then choose “Maximize“.
    Windows Maximize App

FAQ

How do I prevent my application from starting off the screen every time I launch it?

Most applications will stop doing this if you properly exit out of the application while it is on the screen. If you have already properly exited the application, you might need to uninstall and reinstall it.

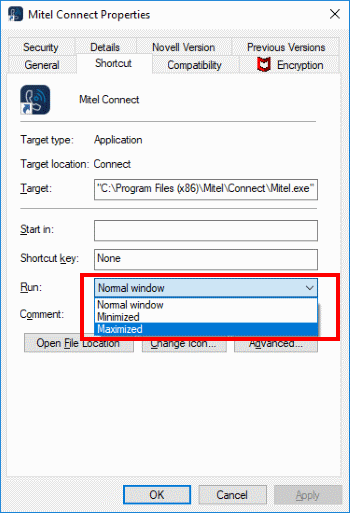
Otherwise, you can try right-clicking the icon for the application, then choosing “Properties“. Under the “Shortcut” tab, change the “Run” setting to “Maximized“, then select “OK“.

Monday, January 29, 2018

How to add Back and Forward buttons to Outlook ribbon?

Ref: How to add Back and Forward buttons to Outlook ribbon?


How To Add Back And Forward Buttons To Outlook Ribbon?

With the Back and Forward buttons in Outlook, you can quickly switch among views you have opened before. As these two buttons are not displayed in Outlook ribbon, in this tutorial, we will show you how to add Back and Forward buttons to Outlook ribbon.

arrow blue right bubbleAdd Back And Forward Buttons To Outlook 2013

If you are using Outlook 2013, you can do as follows to add the back and forward button to the ribbon.
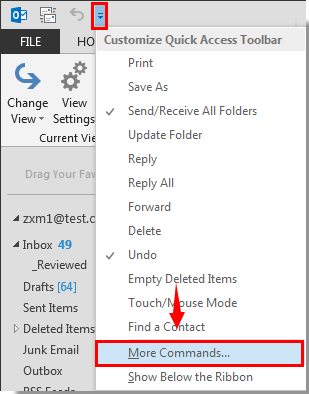
1. Click the Customize Quick Access Toolbar button  in the ribbon, and then click More Commands in the drop-down list. See screenshot:
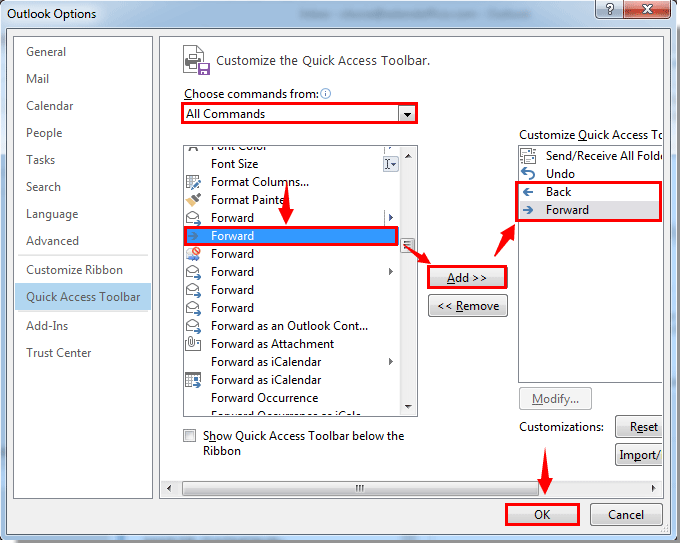
2. In the Outlook Options dialog box, you need to:
1). Select All Commands in the Choose commands from drop-down list;
2). Scroll down to find and select Back in the commands box, then click the Add button;
3). Find and select the Forward which has a right arrow icon before it in the commands box, then click the Add button;
4). Click the OK button. See screenshot:
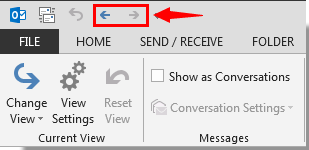
Then the Back and Forward buttons are added to Outlook ribbon.

arrow blue right bubbleAdd Back And Forward Buttons To Outlook 2010

In Outlook 2010, you can add the Back and Forward buttons to ribbon as follows.
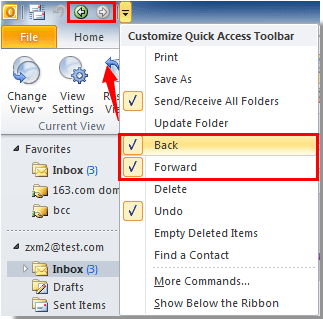
1. Click the  button in the ribbon, check the Back option in the drop-down menu to add it to the ribbon. And repeat the operation to add the Forward button. See screenshot:

arrow blue right bubbleAdd Back And Forward Buttons To Outlook 2007

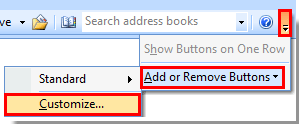
1. In Outlook 2007, click the  button in the ribbon, then click Add or Remove Buttons > Customize. See screenshot:
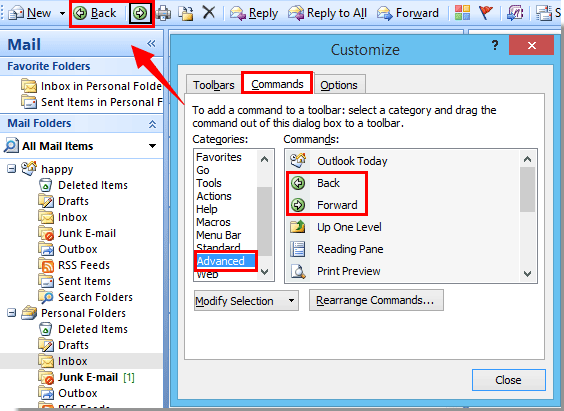
2. When the Customize dialog box pops up, please do as follows.
1). Click the Commands tab;
2). Select Advanced in the Categories box;
3). Select and drag the Back and Forward buttons separately from the Commands list box to the ribbon;
4). Close the Customize dialog box. See screenshot: